Kids Go Gardening - make a mini Hobbit hole
If you have watched The Hobbit movie or visited the Hobbiton movie set you will know that Hobbits live in underground houses called hobbit holes. You might not have room to build a real hobbit hole but you can make a mini one. It’s fun and its easy. Remember, every hobbit hole is different. Yours won’t be exactly like our one! But here’s how we built ours.
First, grow some lush green grass in a tray
You will need:
- Lawn seed [Tip: look for a lawn seed that will germinate fast, within 7 days)
- A seed tray
- Black Magic seed raising mix
- An old tea towel
- Line your tray with the old tea towel. This will make it easy to lift your grass out of the tray when you are ready to make your hobbit house.
- Fill the tray with seed raising mix.
- Put your tray in a sink with a few cm of water and let the seed raising mix soak it up from the bottom, or water gently using a watering can. Leave it to drain for 10 minutes.
- Sow your lawn seed quite thickly.
- Now you need to be patient. Keep the seed raising mix evenly moist as your grass grows.
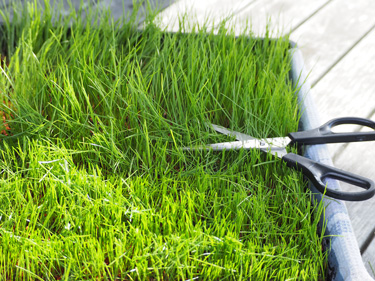
- When it reaches 5-6cm tall, give it a hair cut. This will make it grow thicker. About three weeks after sowing you should have a nice thick carpet of grass to make your hobbit hole.
To make the hobbit hole, you will need:
- Another tray or large saucer
- A small terracotta pot
- Potting mix
- Twigs, pebbles, flowers
- Cardboard and paint
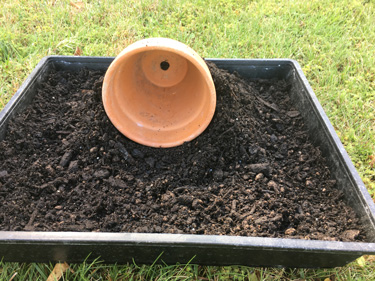
- Fill a tray or a large terracotta saucer with potting mix and position your terracotta pot on top. Allow plenty of space in front of the pot opening to make your garden (see pictures). Use potting mix to lift it at the back so that the opening is at right angles to the tray. Then mound some more potting mix around the sides.
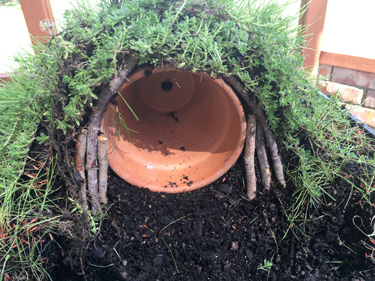
- Holding the edges of the tea towel, lift your grass from its tray and get help to cut it to size so that it lies nicely over the pot and mound.
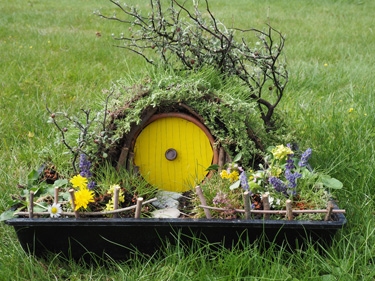
- Now it’s time to decorate! We picked creeping thyme from the garden to cover the edge above the door. You could also use moss or left over bits of the grass you grew. We used sticks to decorate around the doorway and for a little fence. The best flowers to use are little ones. Daisies and dandelions are ideal!
- For the door we used thick corrugated cardboard. Measure the inside of your terracotta pot and cut a circle to fit neatly inside it. Paint your door and add a handle (we used a button, which we wired on with a twisty tie, but you could paint it on instead).
- A twig from a small leafed shrub makes a mini tree and flat pebbles or sand make a pathway.
Here’s an idea - get all your friends to make hobbit holes then put them all together to make a mini Hobbiton! We’d love to see your photos (send them to info@gogardening.co.nz)
Taking care of your hobbit house
Keep your hobbit house in a shady place away from wind and hot sun. Use a mist spray bottle to keep the grass watered. If you're a keen gardening hobbit you can keep your garden looking good by picking new flowers to replace any that wilt.
Did you know?
It isn’t just Hobbit houses that have grass roofs. More and more people are interested in building ‘eco-friendly’ houses with ‘green’ roofs that are covered in plants. A green roof keeps a house cool in summer and warm in winter so it is very energy efficient. A green roof also absorbs rain, which is a good thing because it helps prevent floods and water pollution.

7-Mar-2017

Trim your tray of grass when 5-6cm tall.

Mound potting mix around the terracotta pot.

Use creeping thyme, moss and twigs to cover the edge of the grass.

Add the door and decorate the garden.

